Fabric flowers are so easy to make, and can add flair to any top, jacket, hat, bag...you name it! Trust me, once you start with these things, you will be addicted just like me! I am going to outline how to make 3 different styles of fabric flowers. You can see how I used these flowers in the tutorial for my Embellished Flower Tee!
You will need:
• Scraps of fabric and felt
• needle and thread, fabric tack, or hot glue
• scissors
• embellishments (optional)You will need:
• Scraps of fabric and felt
• needle and thread, fabric tack, or hot glue
• scissors
• Pattern (for Sweetheart only).
Sweetheart Flower Pattern
The first style I like to call the "Sweetheart", and you will see why.
1. Start out with about 8-10 squares of your fabric. If you are using my template you will need 3.5" squares for the large size, and 2" squares for the baby ones. Take each square and fold it in half, and then fold it in half again, so that it forms a smaller square.
2. Place the point of your heart pattern at the corner where the folds are, and pin in place.
3. Cut out pattern through all thicknesses. Now you should have a clover shaped petal when opened.
4. Create your corresponding circle shape out of felt. Take each petal and fold back into heart shape, and with a needle and thread, or a dab of fabric tack or hot glue, attached the point of the heart to the center of the felt base. When folding your hearts it is not necessary to match up the shapes exactly, in fact if you do match them up, your flower may not have as much body. Try folding the shapes on the diagonal.
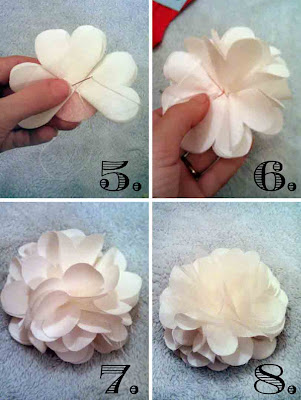
5. Continue attaching three more petals in the center (4 total), matching up the sides.
6. Add another layer of 4 more petals,making sure to stagger the placement so you are not stacking them exactly on top of one another.
7. Fluff your petals a bit, and now you will start to see your flower take shape! If adding an embellishment to the center, such as a button or rhinestone, you can do that now.
8. If you like the look of a plain flower, add two more petals to the center. Or in this example I added several layers of tulle.
And that's all there is too it!
••••••••••••••••••••••••••••••••••••••••••••••••••••••••••••••••••••••••••••••
Next we have the "Bird's Nest" flower. This flower has a very romantic, shabby appearance, especially if you leave the edges raw.
1. Start out by taking at least 15"-20" length of fabric and cut 1"-1.5" strips from it. To create the raw edges, simply snip a starting line with your scissors, and rip the rest of the strip off. This will not work with knits, but will create a nice straight line with your woven fabrics.
2. Next tie a knot at the end of the strip...this will become the center of your flower.
3. Fold your strip in half with the right sides facing out, and start to wrap the strip around the knot, turning every inch or so. This may take a little practice, but you will start to get it down, and it will not need to be perfect. Add a drop of glue, or make a stitch after every couple of turns.
4. When the flower is at the size you want it to be, cut off the excess fabric, and simply glue or stitch the last bit down in the back. Finish up with attaching a felt circle to the backside to hide your glue or stitches.
••••••••••••••••••••••••••••••••••••••••••••••••••••••••••••••••••••••••••••••
And last but not least we have a simple Rosette.
1. Determine what size you would like your finished flower to be, add .5" to that total, and that is how wide you will need to cut your strip of fabric. Mine was about 3.5" wide, and about 24" long. Fold the strip in half lengthwise, so that the long raw edges meet.
2. Take a needle and thread, and make long even stitches all the way down the length of the folded strip. You could also you use the basting stitch on your sewing machine.
3. Pull the tail of your string to gather the fabric. Tuck under one end (I like to fold twice, and angle it down...see pic), and secure it with glue or stitch down.
4. Next create your Rosette by wrapping the gathered strips around the center point, with the raw edges to the center. Secure with thread or glue, and add felt backing.
Of course with any of these flowers you can jazz them up with embellishments. A cluster of tiny pearls, a big rhinestone, a button...I've even glued tiny bird eggs I found in the floral section of the craft store. This is the part where you get to be creative!
If all this looks cool, but a little too complicated for you, my $5 Paparazzi flower clips are AWESOME! They have both an alligator clip and a brooch pin on the back, and some even come with a pony tail holder. Comment on this post, or email me, and I can tell you how to buy!


No comments:
Post a Comment